XenServer 8 GPU Certification Kit Guide
DownloadPublished Mar 2024
V8.4.0 Edition
Table of Contents
- Introduction
- Pre-requisites
- Test Environment Setup
- Certifying GPU Pass-through
- Certifying vGPU
- Submit Test Results
Introduction
This kit includes certification tests for XenServer GPU Pass-through and tests for XenServer vGPU (for details on vGPU, please refer to section Certifying vGPU). Certification kit allows vendors to test a GPU (or multiple GPUs) in a given hardware platform, perform a basic set of compatibility tests, and return the results to XenServer for inclusion on the XenServer GPU Hardware Compatibility List (https://hcl.xenserver.com/). This test consists of four steps:
- Set up XenServer host with GPU(s) installed
- Prepare the Virtual Desktop inside virtual machine
- Set up XenServer guest with GPU-Passthrough and vGPU
- Run the GPU tests
The XenServer certification kit needs to be run with the latest version of the corresponding XenServer Release. Make sure that XenServer 8 has been updated to the latest version before testing.
The tests must be completed with the maximum number of physical GPU cards wish to certify present. All test results should be reported in the xenserver-gpu-verification-form.docx. Each test case execution must be documented by the vendor as passed, failed or other. Possible reasons for other include: not tested justification, does not apply (e.g., the vendor does not support functionality), etc.
For each test, the vendor is asked to provide details that will help XenServer understand the circumstances under which the test was done and the results achieved, e.g., specific settings, software versions used, etc.
The test results will remain confidential and are intended only for mutual use by the vendor and XenServer. XenServer will not share, publish, or otherwise distribute test reports to any other party without prior written consent from the vendor. Fields detailing marketing information e.g., Product Name etc. may be published.
Contents of Test Kit
- SampleConnection.ica – Sample ICA file
- XenDesktopBrokerSettings.reg – Registry settings for the virtual desktop VM
- XenDesktopStateSettings.reg – Registry state settings for the virtual desktop VM
Pre-requisites
- The XenServer HCL (Hardware Compatibility List: https://hcl.xenserver.com/ ) must already contain the server which is being certified for GPU. OEM users can get access the server hardware certification kit via the XenServer website: https://hcl.xenserver.com/certkits/. For non-OEM users, please refer to the hardware manufacturer’s information.
- Ensure the graphics card manufacturer supports the use of their hardware in the chosen server.
- For Citrix Virtual Apps and Desktops, access to an account on an active directory domain controller is required for your VM to be attached to the AD.
Test Environment Setup
XenServer Installation
1.Download XenServer from https://www.xenserver.com/downloads.
2.Install XenServer on a single host. For more information, see https://docs.xenserver.com/en-us/xenserver/8/install.
3.If you are performing a vGPU test, after installing XenServer, install GPU Host driver on XenServer. Please download the GPU Host driver from official website and install it on Host.
3.Install XenCenter on a client Windows machine.
4.Update XenServer to latest version.
5.Verify IOMMU is enabled on the host by executing the following XE commands on the XenServer console:
xe host-list (returns the host_id)
xe host-param-get param-name=chipset-info param-key=iommu uuid=<host_id>
If executing the above command does not return “true”, reboot the host and enable the option in the BIOS.
6.When using NVIDIA vGPU with XenServer servers that have more than 768 GB of RAM, add the parameter iommu=dom0-passthrough to the Xen command line by running the following command in the control domain (Dom0):
/opt/xensource/libexec/xen-cmdline –-set-xen iommu=dom0-passthrough
7.Restart the host.
Prepare Windows Guest
- This certification kit only has to be run on one supported Windows guest OS. The list of supported OS for the latest release is available here: https://docs.xenserver.com/en-us/xenserver/8/graphics.html.
- The Citrix Virtual Apps and Desktops connection needs to be tested on only one of the above operating systems. RDP or VNC can be used for the other tests depending on their availability.
- If hardware constraints allow, the tests for each feature can be run concurrently.
1.Build a Windows VM and install XenServer VM Tools onto the Windows VM. For more information, see https://docs.xenserver.com/en-us/xenserver/8/vms/windows.html.
Note:
To simplify multi-vGPU testing, the VM may be a template or copied to create multiple instances.
2.Enable Remote Desktop on the VM.
Setup Windows Guest
GPU tests also can be done through the virtual desktop. Below are the two options for this certification test with virtual desktop:
Option1: Remote Desktop Protocol (RDP)
Option2: Citrix Virtual Apps and Desktops
Choose one of them for the below GPU tests.
Option1: Through Remote Desktop Protocol
Microsoft Remote Desktop can be used to connect to and control the tested guest from a remote client. Make sure the Remote Desktop is enabled on tested Windows guest. For example, for Windows 10 Guest, refer to the below link to configure the Microsoft’s RDP:
For others, please search the similar guides from Microsoft.
Option2: Through Citrix Virtual Apps and Desktops
If Citrix Virtual Apps and Desktops is chosen as virtual desktop, follow the below steps.
Install Citrix Virtual Apps and Desktops
1.Download the Citrix Virtual Apps and Desktops iso image from the Citrix webpage (https://www.citrix.com/downloads/citrix-virtual-apps-and-desktops/ ). Please use Citrix Virtual Apps and Desktops 7 1912 LTSR or later. Please also refer to https://support.citrix.com/article/CTX224843 to select the correct Citrix Virtual Apps and Desktops version according to the Windows version.
2.Mount the Citrix Virtual Apps and Desktops ISO image to Virtual Desktop machine. For example mounted to D:
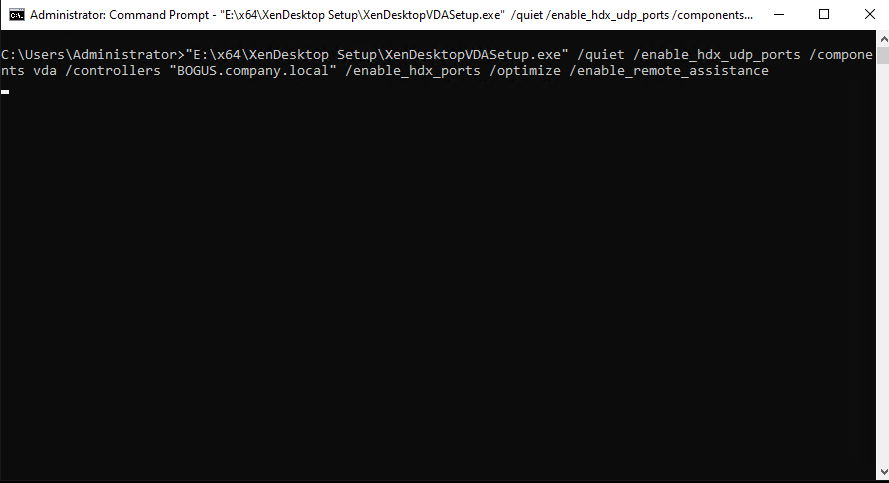
3.Open windows “cmd” teminal and execute following command:
"D:\x64\XenDesktop Setup\XenDesktopVDASetup.exe" /quiet /enable_hdx_udp_ports /components vda /controllers "BOGUS.company.local" /enable_hdx_ports /optimize /enable_remote_assistance
Note:
Modify the path in the above D:\x64\ to agree with architecture and the mount point of the Citrix Virtual Apps and Desktops ISO. For example, if the Citrix Virtual Apps and Desktops ISO is in E: of an x86 machine please use E:\x86\ in the above command.
4.Wait. The execution of the previous step takes a while. The above command may reboot the VM in the middle of the operation, may install additional Windows Updates, etc. After a reboot, the screen of the VM, as viewed through the XenCenter console window, will go black. This is expected behavior at this stage. With continued waiting, the console window eventually recovers from its blackened state and the normal view of the windows OS will return.
Setup Citrix Virtual Apps and Desktops in Brokerless Connection High Availability Mode
1.Click the Windows start button and in the search box enter “Computer Management”.
2.Navigate to Local Users and Groups and click Groups.
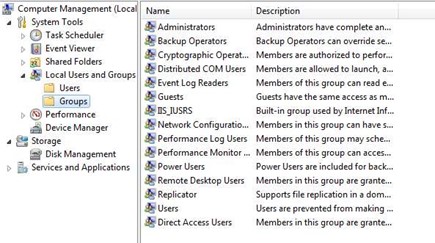
3.Double-click the Direct Access Users group and click Add… on the dialog that appears.
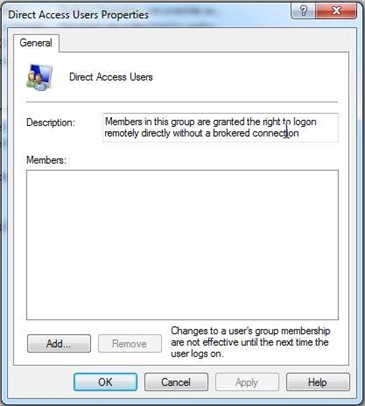
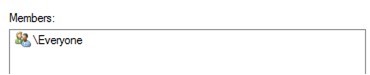
4.Need to add “Everyone” into the box that appears and click OK.
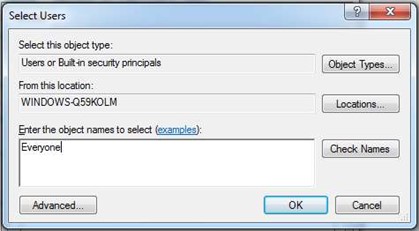
5.The previous dialog will display. “\Everyone” is now listed in the members list of this group.
6.Reboot the VM.
7.Now, Windows VM is about to join a domain. If domain policy does not allow remote desktop policy, disable firewall before start following job. If you are not sure, check with the network administrator. If you do not need to change firewall configuration skip following firewall steps.
8.Click the Windows Start button and type “services” and select Services from list.
9.Find Windows Firewall from the list and double click it. For win10, can open Windows Defender Firewall and click Turn Windows Defender Firewall on or off tab, in this tab click Turn off Windows Defender Firewall. For Windows Server, find Windows Firewall from the list and double click it. Change Startup type to Disabled and click Apply. Click Stop and OK.

10.Change Startup type to Disabled and click Apply.

11.Click Stop and OK.
12.Reboot the machine.
13.Click the Windows Start button. Right-click This PC and select Properties.
14.Click “Rename this PC (Advanced)". Navigate to the "to rename this computer or change its domain or workgroup, click Change” and click Change settings.

15.In the dialog that appears, in the Member of group box, select Domain and enter the name of the active directory server name. Click OK.
16.In the security window that pops up, enter the account and credentials of an account that has permission to connect to the domain. Click OK and wait.
17.You will see a window that welcomes you to the domain. Click OK.
18.Windows will ask you to restart your computer. Reboot the VM.
19.Copy the provided XenDesktopBrokerSettings.reg file onto your VM.
20.Double-click the .reg file and when asked if you are sure you want to continue, click Yes.
Windows should then report it has successfully updated the registry
21.Reboot the VM.
22.Copy the XenDesktopStateSettings.reg file onto the Windows VM
23.From the XenCenter console, or RDP, double click the .reg file. Windows will inform you it has modified the registry. At this point, do not reboot your machine.
Note:
If reboot machine after step 23, steps 22 and 23 need to be repeated .
Prepare the Client Workstation with a Windows Guest
1.Download and install the same version of CWA as Citrix Virtual Apps and Desktops version (e.g 19.12.7000.10) (https://www.citrix.com/products/receiver.html) on the client workstation.
2.Copy the included SampleConnection.ica file to the client machine.
3.Open the included ICA file with notepad, and edit the “Address” and “HttpBrowserAddress” fields
- “Address” should be the Virtual Desktop’s VM IP address.
- “HttpBrowserAddress” should be the Virtual Desktop’s VM IP address followed by “:80” e.g., 192.168.2.3:80
4.Double click the modified ICA file to launch the connection and log in to the Virtual Desktop using the local account credentials.
5.If the ICA does not let you connect, wait for five minutes and try again until you connect to your "Virtual Desktop Windows Guest" successfully.
Prepare Linux Guest
- This certification kit can run on Linux guests to certify GPU Pass-through for Linux support on XenServer 8.0 and later.
- One of the supported Linux OS. For the latest release, see: https://docs.xenserver.com/en-us/xenserver/8/graphics.html. It is recommended to use Ubuntu 20.04 or Rocky 8.x for non-Ubuntu Linux guest.
- VNC and SSH will be used for communication between your workstation and Linux guests. You can also use Citrix Linux Virtual Agent if choice of your Linux distribution and graphics card are supported. (https://www.citrix.com/downloads/citrix-virtual-apps-and-desktops/components/linux-vda-2207.html )
- Both Server flavor and Desktop flavor of Linux distributions are usable for this certification. Desktop flavor may require less set up.
- If hardware constraints allow, the following two tests can be run concurrently.
Setup an Ubuntu Linux Guest
1.This distribution is optional for GPU pass-through for Linux guests. Below is an example with Ubuntu Focal Fossa 20.04.
2.Create a supported Ubuntu guest with at least 4GB of RAM and 50GB of storage. Please note that GPU should not be assigned during Linux installation.
3.Make sure guests are connected to the Internet.
4.Install your Linux distribution by following the steps of the distribution’s installer. Either the server or desktop can be used. These tests are not applicable to other flavors of Ubuntu such as Kubuntu, Xubuntu, Lubuntu or Ubuntu-Gnome.
5.Install XenServer VM Tools for Linux. ( https://docs.xenserver.com/en-us/xenserver/8/vms/linux.html#install-xenserver-vm-tools-for-linux)
6.Open console tab of the guest from XenCenter on the client workstation.
7.(Desktop version only) Please do not use or run ‘Software update’ tool. If it appears automatically, dismiss it.
8.(Desktop version only) Open a terminal. Refer guide of your distribution to find how to open a terminal. If you did not log in as ‘root’ you need to prefix each of the below commands with ‘sudo’ for all commands.
9.Install an SSH server with following the command. Then can connect to VM with a SSH session
# apt-get install -y openssh-server
10.Install GPU driver and verify GPU driver works (example steps for NVIDIA graphic card), before installation GPU guest driver should set up GPU Pass-through at first, please refer section “Setting up GPU Pass-through”
(1) Install dependency packages
# apt-get -y update
# apt-get -y install gcc
# apt-get -y install make
(2) Disable nouveau
# vim /etc/modprobe.d/blacklist-nouveau.conf
(3) Add below into file
blacklist nouveau
options nouveau modeset=0
(4) Save and exit
# update-initramfs -u
(5) Close x server
# systemctl set-default multi-user.target
# reboot
(6) Check if nouveau is disabled
# lsmod | grep nouveau (if no output, then successful)
(7) Install NVIDIA driver. The following steps are for BIOS boot, for UEFI secure boot see https://docs.xenserver.com/en-us/xenserver/8/vms/linux.html#install-third-party-drivers-on-your-secure-boot-linux-vm.
# bash NVIDIA-Linux-x86_64-<version>-grid.run
(8) Verify the NVIDIA driver is installed successfully
# nvidia-smi
(9) Open x server
# systemctl set-default graphical.target
# reboot
11.Add 32-bit environment support and update your OS.
# dpkg --add-architecture i386
# apt-get install mesa-utils -y
12.Execute following commands to install lightdm. Chose lightdm
# apt-get install lightdm -y
# reboot
Check lightdm service
# systemctl status lightdm.service
13.Install and setup x11vnc server with the following command.
Install x11vnc
# apt-get install x11vnc -y
Create x11vc password
# x11vnc -storepasswd
Enter VNC password:
Verify password:
Write password to /root/.vnc/passwd?  [y]/n y
# mv ~/.vnc/passwd /etc/x11vnc.pass
Setup x11vnc service
# vim /lib/systemd/system/x11vnc.service
Add below to x11vnc.service file
[Unit]
Description=Start x11vnc at startup.
After=multi-user.target
[Service]
Type=simple
ExecStart=/usr/bin/x11vnc -display :0 -auth guess -forever -loop -noxdamage -repeat -rfbauth /etc/x11vnc.pass -rfbport 5900 -shared -o /var/log/x11vnc.log
[Install]
WantedBy=multi-user.target
Save and exit
Start x11vnc service
# systemctl enable x11vnc.service
# systemctl start x11vnc.service
Check x11vnc service
# systemctl status x11vnc.service
14.Install ‘Phoronix’, an open-source benchmark tool.
Install phoronix-test-suite on ubuntu20.04
# apt-get install -y phoronix-test-suite
If got error - E: Unable to locate package phoronix-test-suite, then refer to below steps
# apt-get install gdebi-core -y
Download phoronix-test-suite from https://www.phoronix-test-suite.com/?k=downloads e.g. phoronix-test-suite_10.8.4
# wget https://phoronix-test-suite.com/releases/repo/pts.debian/files/phoronix-test-suite_10.8.4_all.deb
# gdebi phoronix-test-suite_10.8.4_all.deb
Setup a Non-Ubuntu Linux Guest
This is mandatory for GPU pass-through for Linux guests. Below is an example with Rocky 8.6.
1.Create a supported Linux guest. with at least 4GB of RAM and 50GB of storage. Please note that GPU should not be assigned during Linux installation.
2.Make sure guests are connected to the Internet.
3.Install your Linux distribution by following the installer through to completion. Any flavor such as server or desktop can be used. A desktop version may be less effort to set up but is not mandatory. In my test, used Rocky 8.6 Desktop with GNOME Desktop and select all Add ones.
4.Install XenServer VM Tools for Linux (https://docs.xenserver.com/en-us/xenserver/8/vms/linux.html#install-xenserver-vm-tools-for-linux )
5.Open console tab of the guest from XenCenter on the client workstation.
6.(Desktop version only) Log in with the account that was created while Linux was installed. Logging in as the root user is acceptable for test purposes.
7.(Desktop version only) Open a terminal. Refer guide of your distribution to find how to open a terminal. If you did not log in with ‘root’, you need to use prefix all commands below with ‘sudo’.
8.(Server version only) Log into the Linux VM. If it is preferred, root can be used for test purposes. Otherwise, you need to use ‘sudo’ for all commands that begin with the ‘#’ prompt.
9.Install an SSH server with following the command. Then can connect to VM with ssh session
# yum -y install openssh-server
10.Update the repository and ensure the system is up-to-date.
# yum -y update
# yum -y install gcc make
# yum -y install epel-release
11.Make sure kernel version is the same between kernel-devel and kernel-headers and your kernel itself
# rpm -qa | grep -E "kernel-devel|kernel-headers"
# uname -r
12.Install GPU guest driver and verify GPU driver works properly (example steps for NVIDIA graphic card), before installation GPU guest driver should set up GPU Pass-through at first, please refer section “Setting up GPU Pass-through”
Disable nouveau
# vim /etc/modprobe.d/blacklist-nouveau.conf
Add below into the file
blacklist nouveau
options nouveau modeset=0
Save and exit
Close x server
# systemctl set-default multi-user.target
# reboot
Check if nouveau is disabled
# lsmod | grep nouveau (if no output, then successful)
Install NVIDIA guest driver
# bash NVIDIA-Linux-x86_64-<verison>-grid.run
Verify NVIDIA guest driver is installed successful
# nvidia-smi
Open x server
# systemctl set-default graphical.target
# reboot
13.(Server version only) Run the following command to install the X-windows system.
# yum -y groups install “Server with GUI”
14.Install and setup x11vnc server auto start when boot with the following command.
Install x11vnc
# yum install -y x11vnc
Setup password
# x11vnc -storepasswd
  Enter VNC password:
  Verify password:
  Write password to /root/.vnc/passwd?  [y]/n y
# mv ~/.vnc/passwd /etc/x11vnc.pwd
Setup x11vnc service
# vim /etc/systemd/system/x11vnc.service
Add below to file x11vnc.service
[Unit]
Description=Remote desktop service (VNC)
Requires=display-manager.service
After=display-manager.service

[Service]
Type=forking
ExecStart=/usr/bin/x11vnc -display :0 -forever -shared -bg
-rfbauth /etc/x11vnc.pwd -o /var/log/x11vnc.log
ExecStop=/usr/bin/killall x11vnc
Restart=on-failure
RestartSec=5

[Install]
WantedBy=multi-user.target
Save and exit
# systemctl enable x11vnc.service
# systemctl start x11vnc.service
Verify x11vnc start correcting
# systemctl status x11vnc.service
15.If it is supported, download and install Citrix Linux Virtual Desktop from https://www.citrix.com/downloads/citrix-virtual-apps-and-desktops/components/.
Use Linux Virtual Delivery Agent 1912 LTSR or later. Please refer corresponding documentation for detailed instructions.( https://docs.citrix.com/en-us/linux-virtual-delivery-agent/current-release/installation-overview/easy-install.html#step-1-prepare-configuration-information-and-the-linux-machine )
16.Modify the firewall of the Linux machine to allow connections to the VNC server and/or Citrix Linux Virtual Desktop.
# firewall-cmd --permanent --zone=public --add-service vnc-server
# firewall-cmd --reload
17.Run the following commands to install the required development tools.
# yum -y install mesa-libGL mesa-libGL-devel mesa-libGLw-devel freeglut-devel unzip yasm
opencl-headers xorg-x11-server-devel compat-libstdc++-33 openal openal-devel
glibc.i686 libstdc++.i686 libX11.i686 libXext.i686 libXrandr.i686 libXinerama.i686 mesalibGL.
i686 openal-soft.i686

# wget http://springdale.princeton.edu/data/springdale/7/x86_64/os/Addons/Packages/openal-soft-1.16.0-2.sdl7.i686.rpm
# rpm -Uvh openal-soft-1.16.0-2.sdl7.i686.rpm
# yum install mesa-libGL-devel.i686
18.Install Phoronix, an open-source benchmarking tool.
# yum -y install phoronix-test-suite
Prepare the Client Workstation with a Linux Guest
You must do the GPU tests through the virtual desktop. Below two options are suggested for this certification test:
Option1: Virtual Network Computing (VNC).
Option2: Citrix Linux Virtual Desktop.
Choose one of them for the below GPU tests.
Verify the GPU is Installed
1.Connect to guest via SSH.
2.From SSH, run either one of gdm if running Redhat Enterprise Linux, CentOS or Oracle Enterprise Linux, or lightdm if running Ubuntu.
# systemctl start gdm
Or
# systemctl start lightdm
3.From SSH, start the VNC server or X11VNC. Note display number of which the session uses. Citrix Linux Virtual Desktop can also be used if it is installed and set up.
# systemctl start x11vnc.service
Or
# systemctl start ctxhdx
# systemctl start ctxvda
4.If using Citrix Linux Desktop,
(1).Open CWA and connect to guest from client workstation.
(2).Open a ‘Terminal’. If your Linux desktop environment is GNOME based, ‘
may open it. You can also open a terminal from menu.
(3).Run ‘lspci’ and ‘glxinfo’ from terminal to confirm that the device driver is installed and configured properly.
# glxinfo
# lspci –k
(4).Run the following command from terminal, which will save the results to files for the final submission.
# glxinfo > ~/glxinfo_output.txt
# lspci -k > ~/lspci-k_output.txt
Certifying GPU Pass-through
Certifying GPU pass-through requires to do test with Windows guests or Linux guests.
Certifying GPU Pass-through for Windows Guests
Configure Pass-through for Windows Guest
1.Shutdown the VM and open the VM properties in XenCenter by right-clicking on the VM and selecting properties. A properties dialog appears.
2.In the VMs properties select the GPU tab and choose the appropriate GPU from the list.
3.Boot the VM, connect via Remote Desktop, and install the latest Windows GPU driver from the appropriate vendor. Reboot the VM.
4.Verify the GPU is displayed correctly in the Windows Device Manager.
Windows Guest Performance Evaluation
The Windows Assessment Tool (WinSAT) tests the components of your computer (CPU, GPU, RAM, etc.) then measures their performance. This is only for the vendors who choose Citrix Virtual Apps and Desktops as the virtual desktop. If there are multiple GPUs present, they can be tested simultaneously.
1.Click on the windows Start button and in the search box type “cmd”. Click the cmd program.
2.For non-server editions of Windows, in the cmd window type “winsat formal –xml C:\wsformal.xml” and press enter. This will create a results file called C:\wsformal.xml. For server-based editions of Windows please substitute the above command with two alternative commands: “winsat d3d –xml C:\wsd3d.xml” and “winsat dwm –xml C:\wsdwm.xml” which will produce two results files “C:\wsd3d.xml” and “C:\wsdwm.xml”.
3.Allow the winsat program to complete, which may take several minutes. Please note that your Citrix Virtual Apps and Desktops session may become interrupted but should recover. This is expected behavior. Once finished, the cmd window resembles the following image:
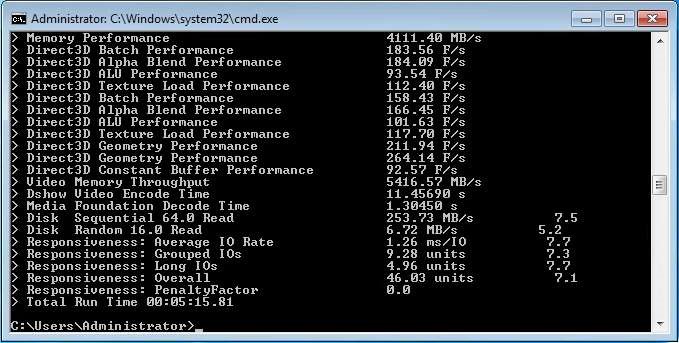
4.Move the newly created results file(s) into a separate location as it will be required for certification and may be overwritten by subsequent steps.
5.Reboot your virtual machine(s), run winsat application again, as described above.
6.Move the second version of the results file(s) into a separate location as it will be required for certification.
7.Validate that the GPU is passed through correctly by checking the Windows Device Manager for the passed-through GPU.
Test Windows Guest Benchmark
Follow the below steps to prepare the benchmark test on the Windows Guest you install above.
1.Download and install latest 7-zip from http://7-zip.org/download.html, or any other decompression software available.
2.Download latest PHP from http://windows.php.net/download/ and unzip it into C:\php.
Please be aware of architecture of your guest OS and ensure you download ‘thread safe’ version.
3.If required, install ‘Microsoft Visual C++ redistributable packages for Visual Studio’. https://docs.microsoft.com/en-us/cpp/windows/latest-supported-vc-redist It will be asked when you first run PHP in case it is required.
4.Download Phoronix Test Suite for windows from https://www.phoronix-test-suite.com/?k=downloads and decompress onto 5.Click the Start button and type ‘cmd'. When Command Prompt or cmd appears right-click on it and choose Run as administrator.
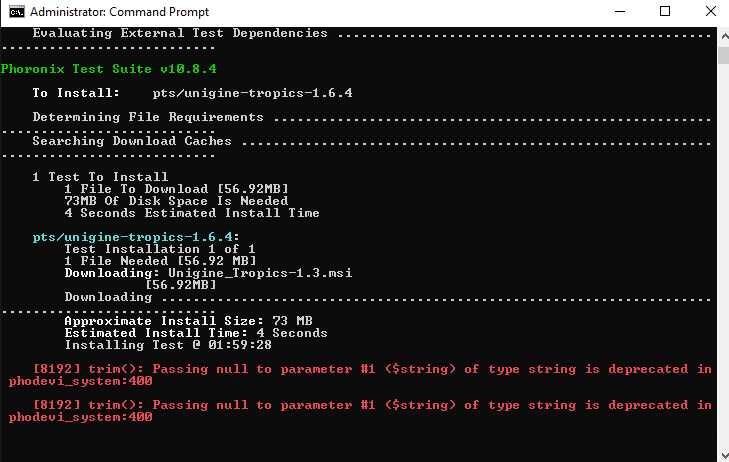
6.Execute following commands to allot the Phoronix test framework to install Tropics benchmark tool.
C:
CD C:\phoronix-test-suite
Set PHP_BIN=C:\php\php.exe
phoronix-test-suite install pts/unigine-tropics
7.Wait for a few minutes while Tropics is downloaded and installed. You may need to click OK button in order to install openAL drivers during the installation. If Unigine_Tropics-1.3 is not installed automatically, need to install it manually, it can be found in “C:\Users\Administrator.phoronix-test-suite\installed-tests\pts\unigine-tropics-1.6.4\Unigine_Tropics-1.3.msi”
Note: Benchmark test with Tropics is not applicable to all lower end graphics cards in all environments, as Tropics can require too much video memory. Minimum requirements state 256 MB being the lower limit. If the test fails, due to these limits, please provide a screenshot and an explanation as part of your submission.
This test can be run on any single supported Windows OS.
1.Launch the previously installed Unigine Tropics benchmark application from the Start menu or desktop icon.
2.In the launcher window set the following values:
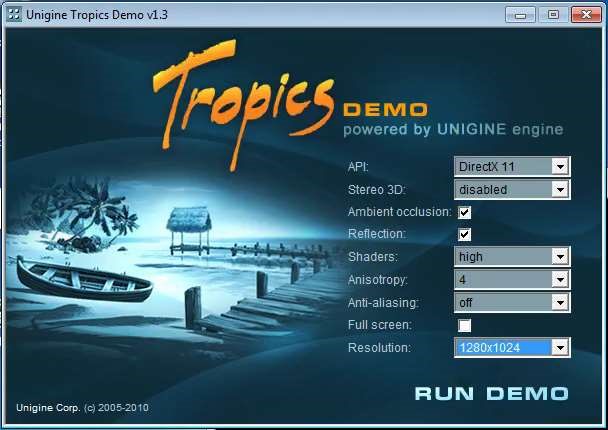
Note: Make sure the resolution is set to 1280x1024.
3.Click Run Demo.
4.Allow the test to continue for half an hour to ensure that the system is stable for this period of time. Any hangs/crashes during this period will invalidate the certification result.
5.Reboot your virtual machine(s), run Unigine Tropics again as described above.
6.Validate that the GPU is passed through correctly by checking the Windows Device Manager for the passed-through GPU.
7.Watch for any major differences in performance or compatibility between the VM reboot(s), Please take screeshot and attach it to submission ticket.
Test Windows Guest Crash and Recovery
The following steps aim to verify that a Windows blue screen crash is visible via XenCenter and that the Virtual Desktop recovers correctly from a full memory dump.
This test only needs to be performed for a single VM but should be done with the maximum number of GPUs passed through.
1.In the same VM used for the above testing set the CrashDumpEnabled registry entry to 1 in the following registry sub-key: HKEY_LOCAL_MACHINE\SYSTEM\CurrentControlSet\Control\CrashControl
2.Reboot the VM.
3.Click Start, right-click Computer, and then click Properties. Click Advanced system settings.
4.In the Startup and Recovery section select Settings.
5.Set the Write debugging information to Complete memory dump. Also make sure the Automatically Restart option is turned off.
6.In the XenServer console run the following commands to trigger an NMI crash:
xe vm-list
This command returns the UUID for all VMs. Locate the UUID of your test VM.
list_domains | grep <VM UUID>
This command returns the VM domain UUID.
/usr/sbin/xen-hvmcrash <domain UUID>
7.Take a screen capture of the blue screen (PrtScn) that will be visible on the XenCenter VM console and include it in the submission. It is expected behavior to lose connection to the Virtual Desktop.
8.Once the memory dump is complete and the VM has rebooted, reconnect to the Virtual Desktop and verify the following:
- The GPU is still passed through correctly by checking the Windows Device Manager for the passed-through GPU.
- Windows Aero is still enabled and displays no visible artifacts.
More information about forcing an NMI crash on XenServer can be found on the Citrix website
http://support.citrix.com/article/CTX123177/.
Certifying GPU Pass-through for Linux Guests
Setting up GPU Pass-through
1.Turn off the VM.
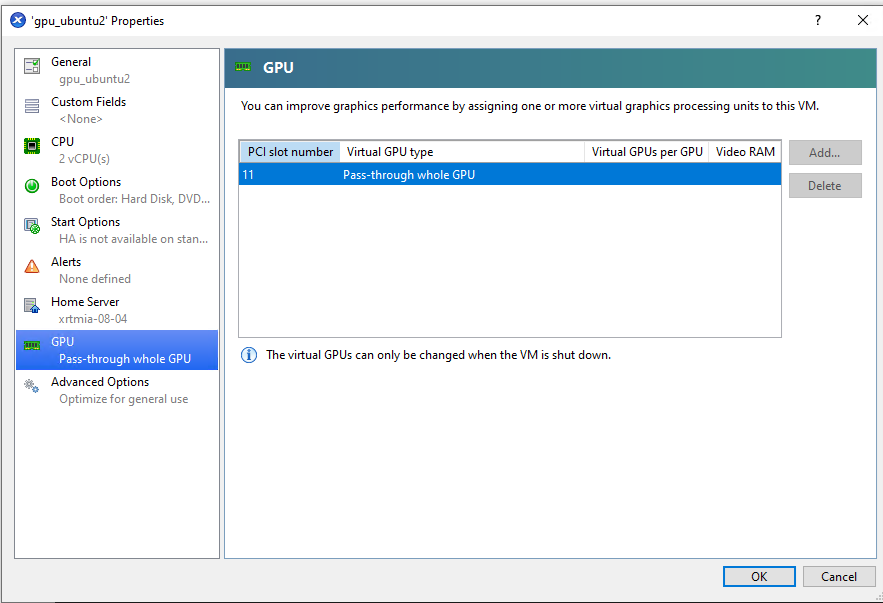
2.Right click on the guest from panel on left and select Properties.
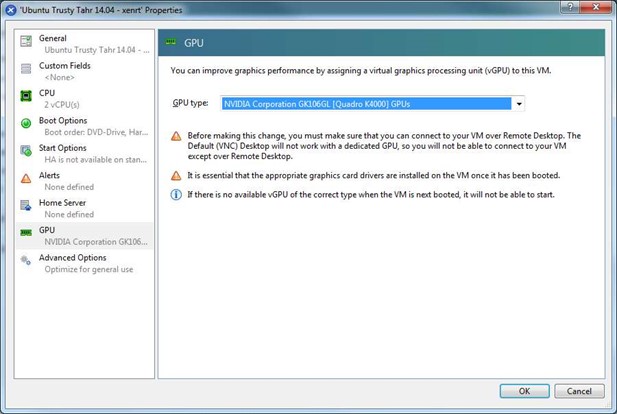
3.Select GPU from panel on left and select graphic card from GPU type list. Then click OK.
5.From the client workstation, connect to the VM through SSH.
6.Install the commercially supported device driver provided by the graphics card manufacturer for the tested OS and any required software on the guest from SSH, VNC, or CWA.
7.Reboot the guest if it is required.
Run the Functional Test
1.Create windows client VM to install VNC Viewer or Citrix Workspace Client , then can launch X11VNC or Citrix Linux Virtual Desktop Session.
2.Install the required benchmarks with Phoronix Test Suite. Please note that these steps may take a while. Please also note that you need to agree terms of Phoronix Test Suite but anonymous statistics reporting is not mandatory. If openCL dependency regarding opencl-header(s) is reported when you install ‘pts/x264-opencl’, please ignore and keep installing. It is manually installed already.
# phoronix-test-suite install pts/x264
If failed to install pts/x264 on Rocky8
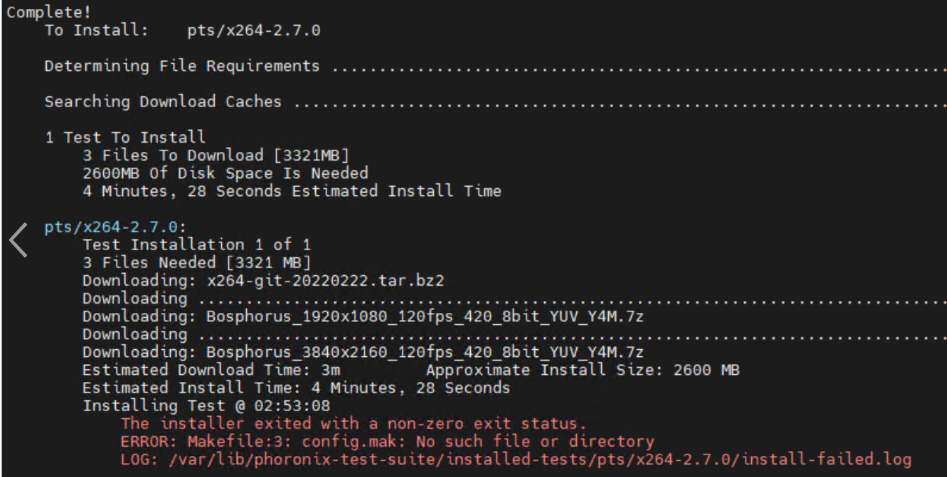
Need to install nasm 2.15 by manual
#curl -O -L https://www.nasm.us/pub/nasm/releasebuilds/2.15.05/nasm-2.15.05.tar.bz2
# tar xjvf nasm-2.15.05.tar.bz2
# cd nasm-2.15.05/
# ./configure
# make
# make install
# phoronix-test-suite install pts/x264-opencl
If failed to install pts/x264-opencl on ubuntu20.04
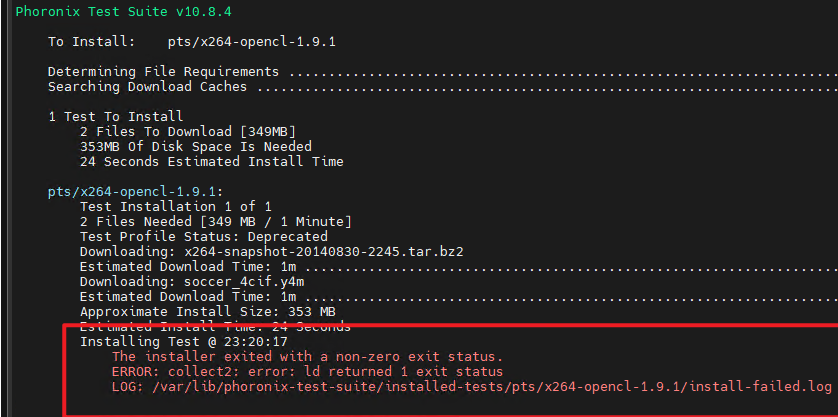
Find download path for "x264-snapshot-20140830-2245.tar.bz2"
# find / -name "x264-snapshot-20140830-2245.tar.bz2"
Unzip file
# tar -jxvf /<path>/x264-snapshot-20140830-2245.tar.bz2
Edit "configure" file in unzip folder "x264-snapshot-20140830-2245"
# vim /<path>/x264-snapshot-20140830-2245/configure
Change in line 275 shared="no" to shared="yes", then save and quit
Zip folder "x264-snapshot-20140830-2245" to tar.bz2 file
# rm /<path>/x264-snapshot-20140830-2245.tar.bz2
# tar -vcjf /<path>/x264-snapshot-20140830-2245.tar.bz2 /<path>/x264-snapshot-20140830-2245/
Run install again
# phoronix-test-suite install pts/x264-opencl
# phoronix-test-suite install pts/unigine-tropics
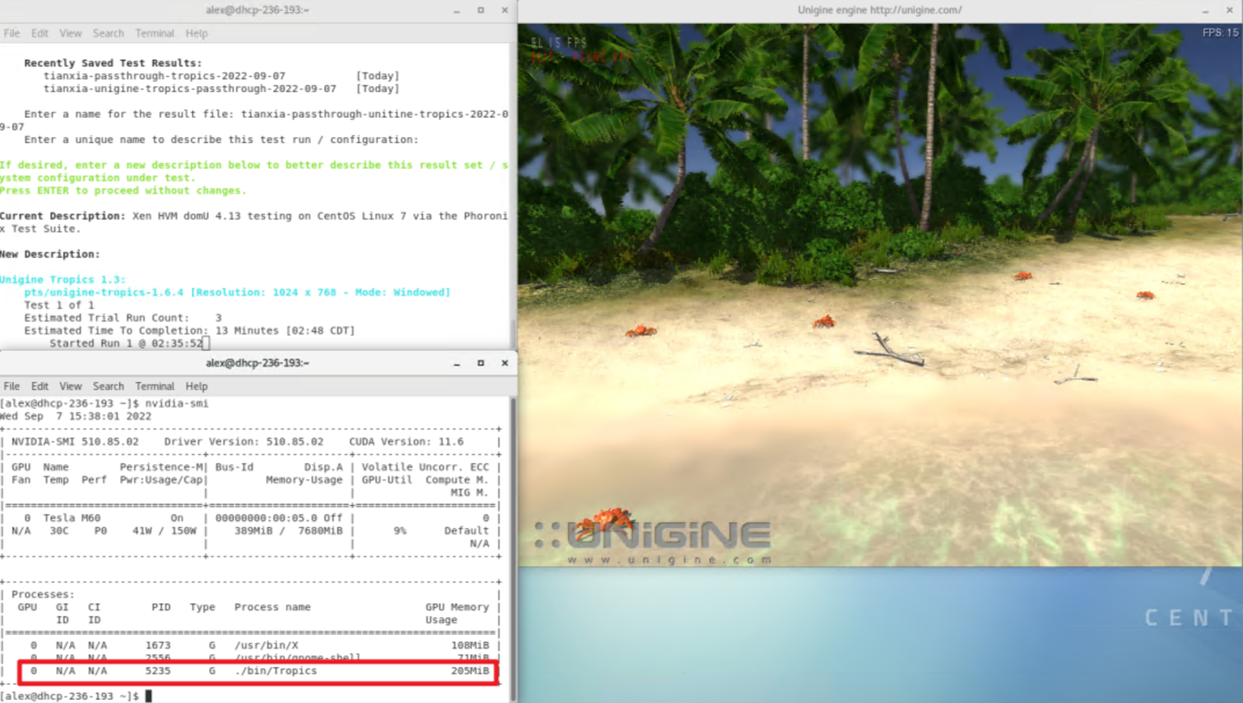
3.Before running the test, need to do preparation.
• Create file /etc/X11/xorg.conf by "nvidia-xconfig" and reboot the guest.
• For passthough graphics, if your graphics Xorg config is working correctly, you’d expect to not see anything on the XenCenter guest console (In vGPU the console continues to work).
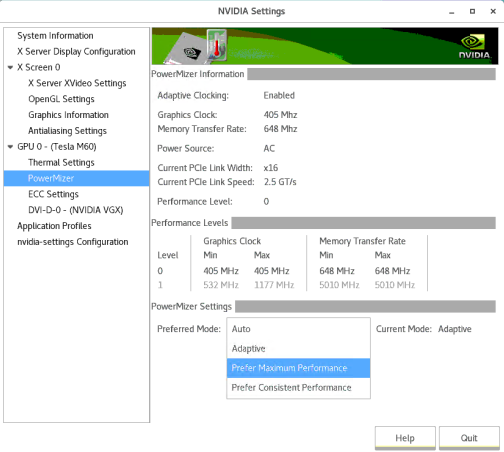
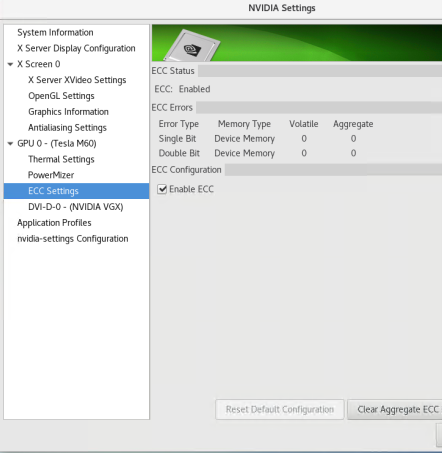
• Launch X11VNC/Citrix Virtual Apps and Desktops session with using VNC Viewer/CWA on client VM, run "nvidia-settings" in this session, then can check or change the NVIDIA settings. (e.g. enable ECC)
4.Run installed benchmarks in the VNC or Citrix Linux Virtual Desktop Session. You need to input an appropriate name for each run when asked. When screen resolution is required, please choose ‘1024x768’ only. You do not need to run tests on all the available screen resolutions or full screen.
Note:
If there is multi graphics in your system, please make sure, that correct graphics has been in used for the test.
# phoronix-test-suite run pts/x264
# phoronix-test-suite run pts/x264-opencl
# phoronix-test-suite run pts/unigine-tropics
5.Archive test results into a single file ‘test-results.tgz’ for submission with the following command.
# [[ -d .phoronix-test-suite/test-results ]] || mkdir .phoronix-test-suite ; ln -s /var/lib/phoronix-test-suite/test-results .phoronix-test-suite/
# tar -chzf test-results.tgz .phoronix-test-suite/test-results
Certifying vGPU
Certifying vGPU is optional for certifying GPU card but requires to list vGPU feature for GPU card in HCL tickets.
Important:
This certification step is optional
XenServer8 guests support vGPU
vGPU depends on operating system support. For XenServer 8 guests which support vGPU see here: https://docs.xenserver.com/en-us/xenserver/8/graphics.html.
Certifying a vGPU for Windows Guests
Virtual-GPUs (vGPUs) are physical GPUs that have had their resources partitioned to allow multiple VMs to use a single physical GPU. This test is optional but can be run on GPU enabled hosts that contain supported graphics cards. For vGPU cards that support multiple configurations, only a single non-pass-through configuration needs to be certified.
Note:
The list of supported OS for the latest release is available here: https://docs.xenserver.com/en-us/xenserver/8/graphics.html.
You can use vGPU with XenServer without a license (Trial Edition), but only in pools of up to three hosts. If you want to complete this certification in a larger pool, you must deploy a Citrix License Server to host your license. for more information, see https://docs.xenserver.com/en-us/xenserver/8/overview-licensing.
Verify the vGPU Migration Functionality
This test only needs to be run on one supported Windows guest OS.
1.If you are planning to test GPU pass-through cert it is recommended that completing pass-through testing before continuing with the remainder of the vGPU certification kit.
2.For vGPU certification you need to setup two hosts with using same GPU card.
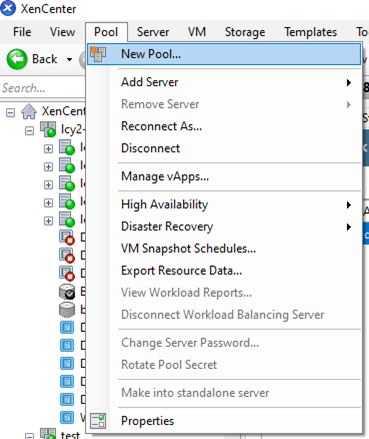
3.Create a Pool with two hosts
(1) Create a pool with XenCenter: click Pool -> New Pool
(2) Select the hosts set up in the previous steps.
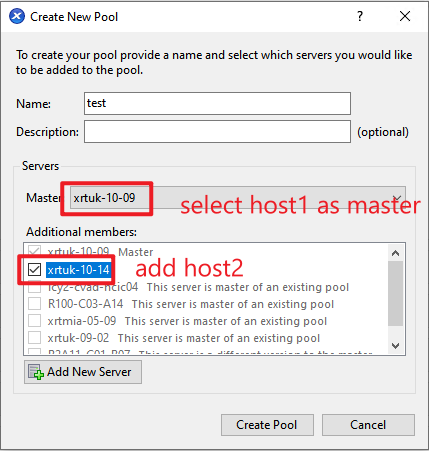
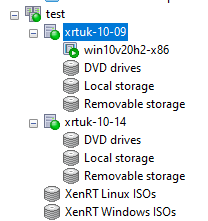
(3) Click Create Pool to finish, after which you should be able to see a pool with two hosts in XenCenter.
4.Install hotfixes on the XenServer in pool and reboot all hosts.
5.Install any vendor-specific host drivers on the XenServer and reboot the host. please refer below example steps to install NVIDIA host driver
Download driver
# wget https://<Path-to-Download>/NVIDIA-vGPU-xenserver-8-<version>.iso
Install driver on host.
# xe-install-supplemental-pack NVIDIA-vGPU-xenserver-8-<version>.iso
Restart the XenServer.
# reboot
After you restart the XenServer, verify that the software has been installed and loaded correctly by checking the NVIDIA kernel driver
# lsmod | grep nvidia
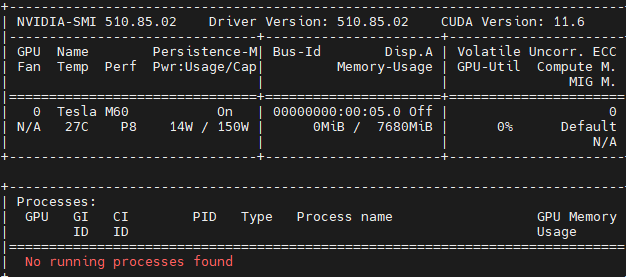
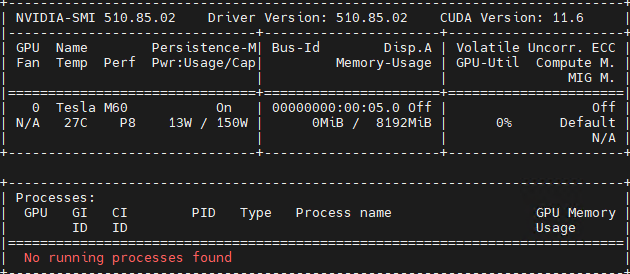
Verify that the NVIDIA kernel driver can successfully communicate with the NVIDIA physical GPUs in your host. Run the nvidia-smi command to produce a listing of the GPUs in your platform similar to:
# nvidia-smi

6.Ensure steps 4 and 5 are completed for all hosts using the same XenServer and driver version, and each host is rebooted.
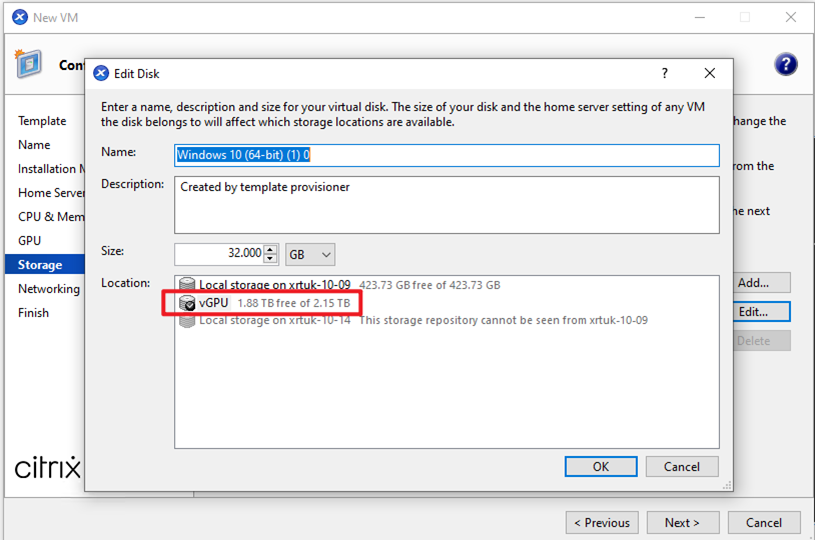
7.It is recommended to create shared storage SR if available and put VM’s disk onto this shared storage, it will speed up for VM migration. Below is an example for creating New SR in pool.
(1) Right click the pool name on XenCenter and select New SR.
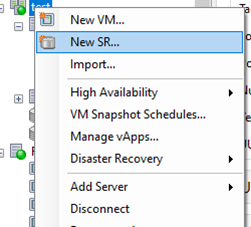
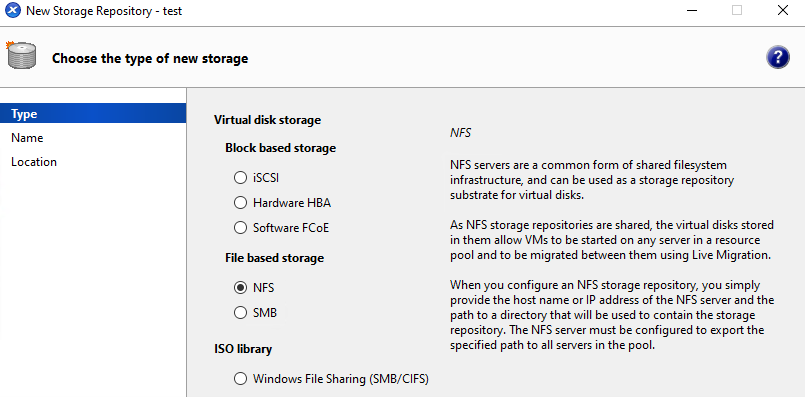
(2) Here is an example for NFS, select NFS and click Next.
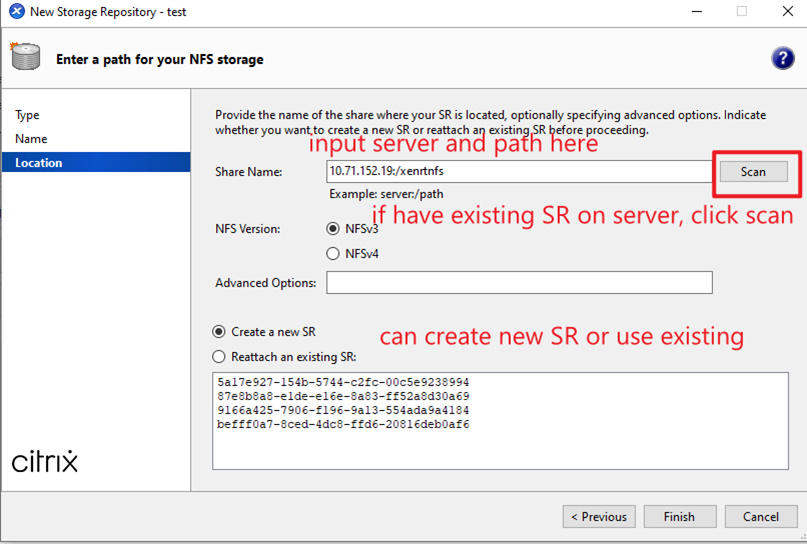
(3) Input the SR name and click Next.

(4) Input the Share Name and click Finish.
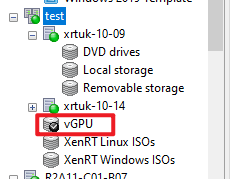
(5) Then can find this SR in the pool on XenCenter.
8.Using XenCenter, create a VM on host1 and select SR which has been created in above step as storage, as detailed the product documentation.
9.When adding the GPU type to the VM ensure a non-pass-through GPU is selected, for example:
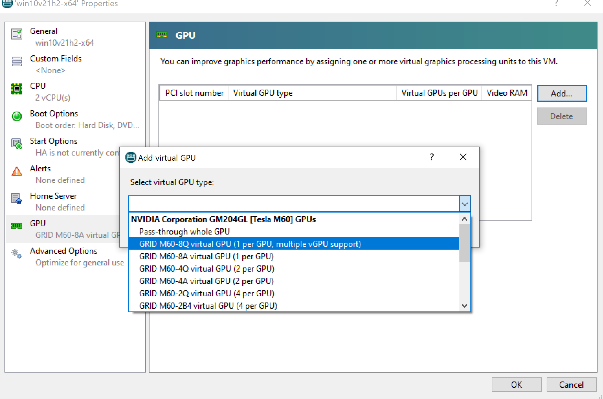
Note: Please make sure to choose a vGPU type with ≥256MB memory.
10.Download and install the vendor-specific guest drivers on the VM.
11.Reboot the VM.
12.After reboot, please ensure vGPU works well, e.g., check GPU in task manager.
13.Verify vGPU migration without workload.
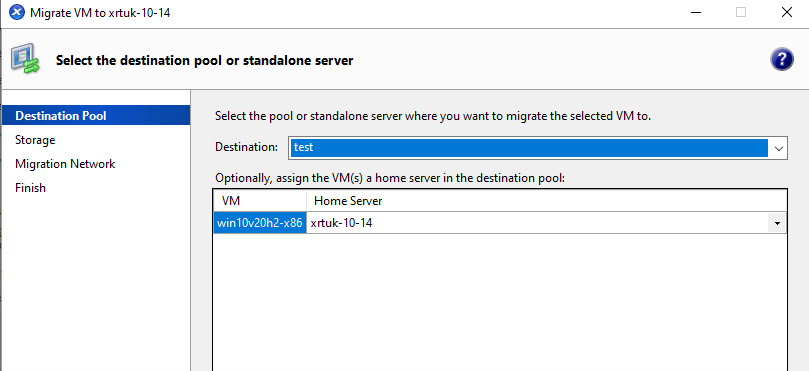
(1) Right click VM on XenCenter and move to Migrate to Server and select host2. (Please take screen captures as below and include it in the submission), it can be found on XenCenter -> Notifications -> Events.

Note: If VM’s disk was putted on SR, then no need to do below steps 2 to 5, after click host2 name as above screen shows, the VM migration will start immediately.
(2) Select pool and VM
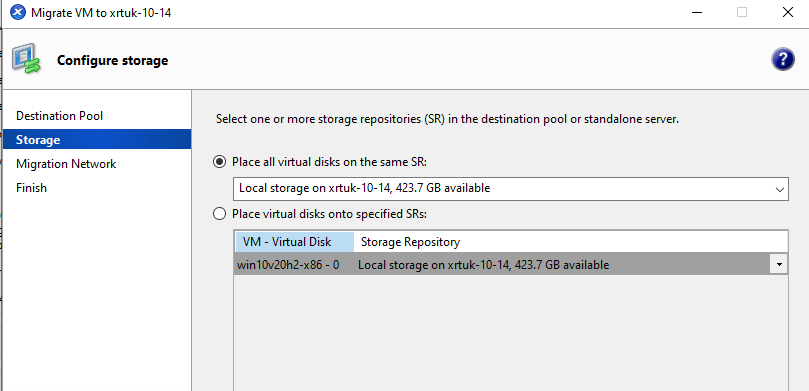
(3) Setup storage and click Next.
(4) Setup Migration Network and click Next.
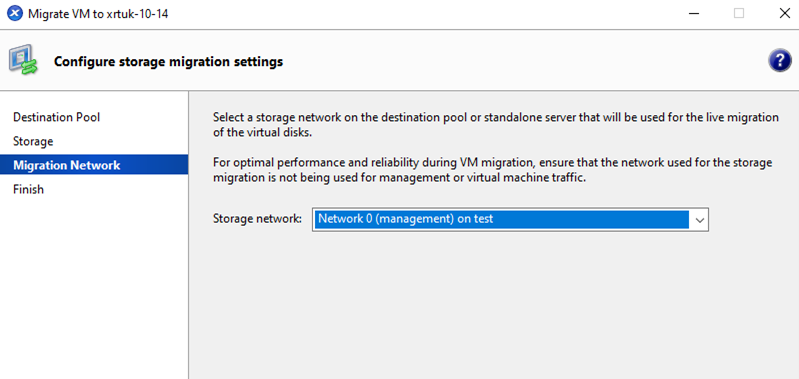
(5) Click Finish to start migration. Please wait until migration process finished.
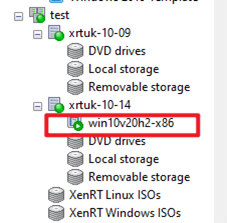
(6) Now can see VM on host2 in XenCenter. Please take screen captures as below and include it in the submission
(7) After VM migration please reboot the VM
(8) Please run the benchmark test, which can be referred section Run the benchmark test in Certifying GPU Pass-through for Windows guests.
14.Verify vGPU migration with workload.
(1)Run Unigine Tropics with using VM on host2.
(2)During the Unigine Tropics is running, migrate VM from host2 to host1.
(3)Take screen capture of XenCenter incuding VM console which running Unigine Tropics during VM migration and include it in the submission.
(4)Take screen capture of XenCenter when VM migation is done and include it in the submission.
15.Submit the collected results according to the Submit Test Results section.
Verify the vGPU Scalability
This test verifies that the system operates at full scale.
1.Create three VMs of the supported operating system types.
2.Assign vGPUs to each of the VMs.
3.Ensure the XenServer tools and the vendor’s graphics drivers are installed and the vGPU is in use for each VM.
4.Shutdown all the VMs.
5.Clone a random selection of VMs up to the capacity of the entire GPU card. For example, for a card containing four physical GPUs, which is being partitioned into two vGPUs, then create 8 VMs.
6.Boot all the VMs.
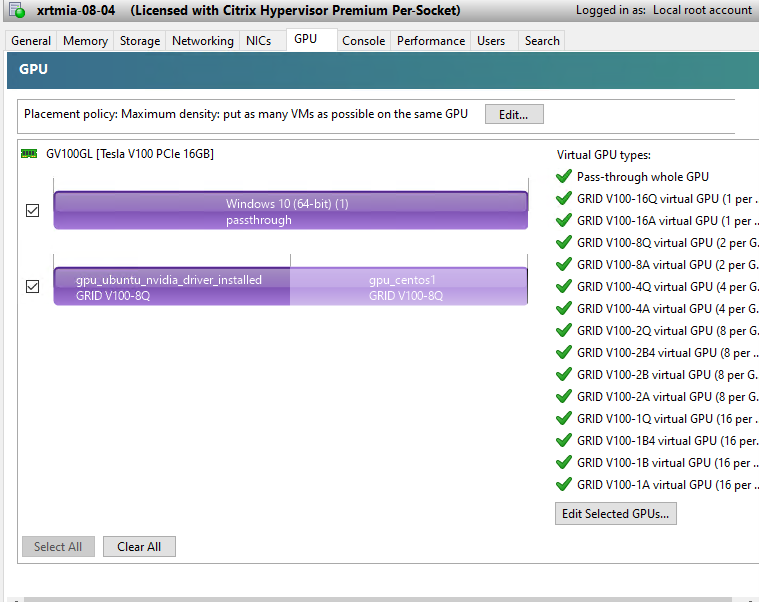
7.Verify that all the physical GPUs are occupied, by using XenCenter, selecting the host and choosing the GPU tab.
On the GPU tab, all the physical GPUs should indicate they are in use (purple) and there should be no empty vGPU slots displayed (dark grey). The following screenshot shows a partially occupied GPU card:
8.Verify that each VM has booted properly and is usable. Any failures to boot, blue screens, etc. will invalidate the test. Please take a screenshot of the failure and include it to the submission.
Certifying Multiple vGPU for Windows Guests
Important:
This certification step is optional.
Multiple vGPU enables multiple virtual GPUs to be used concurrently by a single VM. Only certain vGPU profiles can be used and all vGPUs attached to a single VM must be of the same type. These additional vGPUs can be used to perform computational processing. For more information about the number of vGPUs supported for a single VM, See Configuration Limits.
This feature is only available for NVIDIA GPUs. For more information about the physical GPUs that support the multiple vGPU feature, see the NVIDIA documentation.
Same as certifying a single vGPU for Windows guests, Certifying Multiple vGPU need to prepare pool, install vGPU host driver and setup a Windows VM, please refer steps in section Certifying a vGPU for Windows guests to prepare the test environment.
The difference is that multiple vGPU assigned to a single Windows VM, below is an example for adding multiple vGPU to single VM.
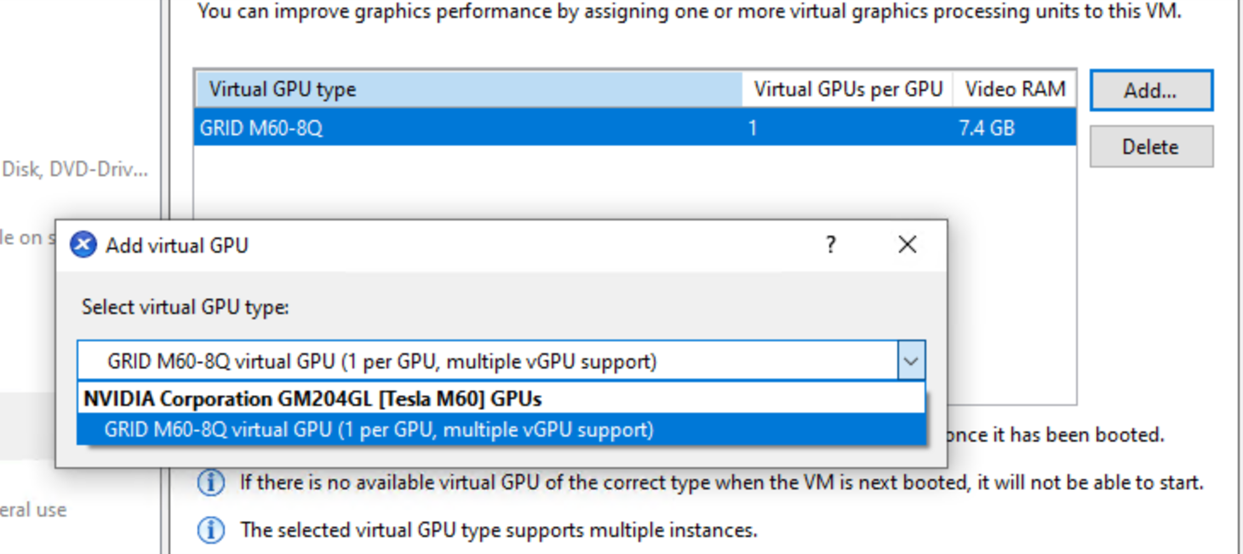
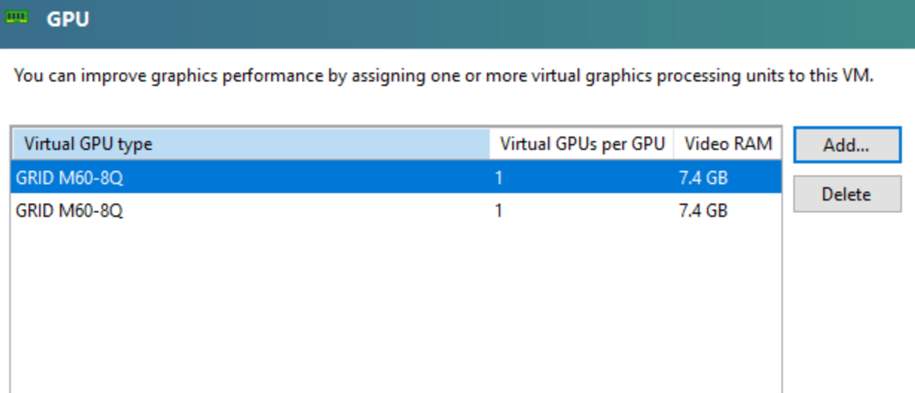
(1) Shutdown the Windows VM, then right click the VM on XenCenter and select “Properties”, in the new opening properties window, click GPU tab to add vGPU for VM. Here is a sample with NVIDIA M60 GPU card.
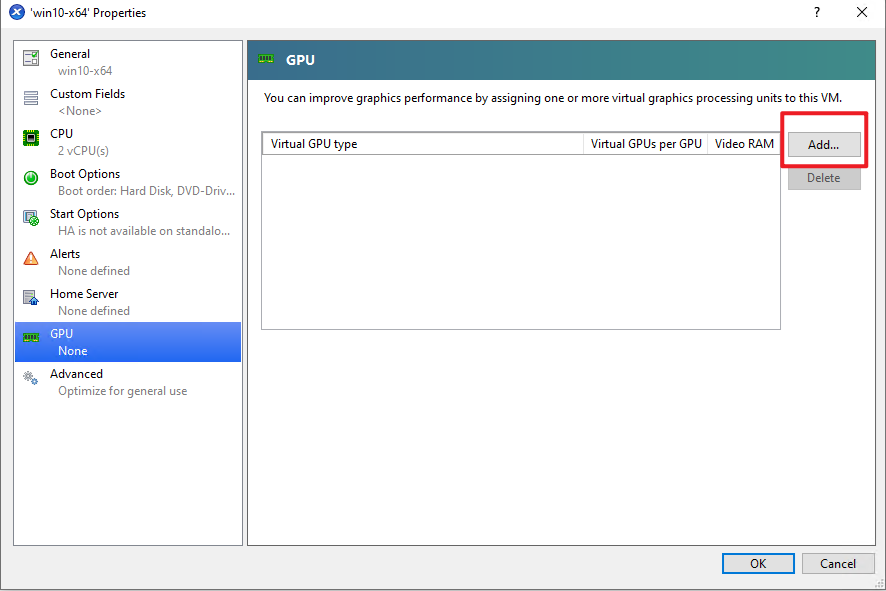
(2) Click “Add” and select GRID M60-8Q to add one vGPU first, it shows “1per GPU, multiple vGPU support”, then click “Add” again to add one more vGPU to the VM.
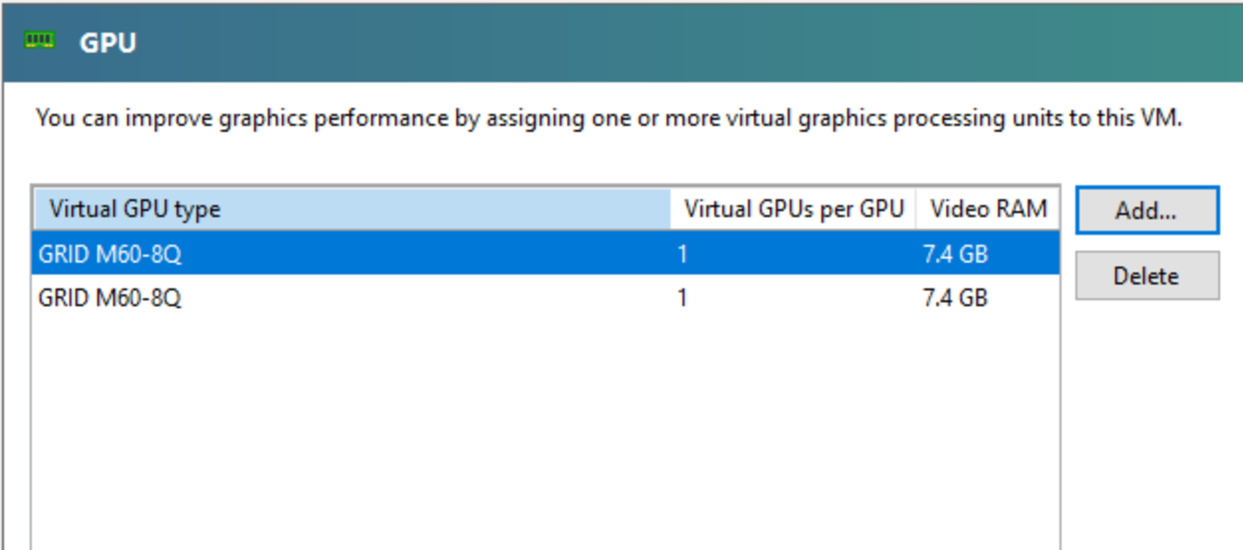
(3) Now can see that there are two vGPUs in the VM. (Please add this screenshot in test report).
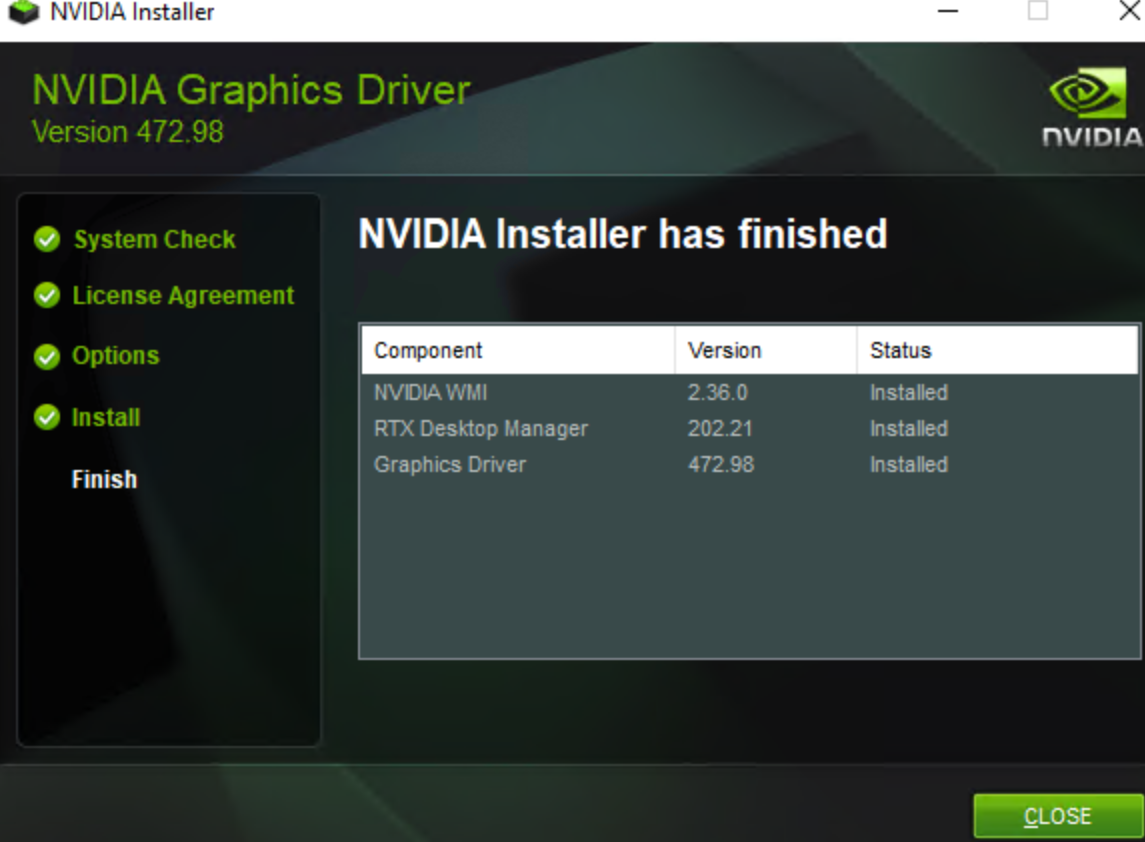
(4) Same as single vGPU, now need to start VM and install guest driver for it.
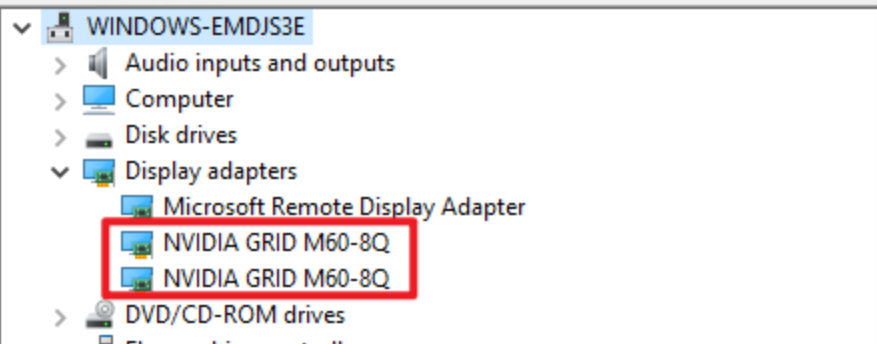
(5) After driver has been installed, can check vGPUs in device manager, there are two NVIDIA GRID M60-8Q vGPU.
(6) Now can run the test for GPU certification, please refer to section Certifying a vGPU for Windows guests to do the same test and submit the test report.
Certifying vGPU for Linux Guests
Note:
This certification step is optional.
Certifying vGPU for Linux guests requires certifying GPU Pass-through for Linux guests. First complete the steps in the section Certifying GPU-Passthrough for Linux guests. Instead of select a GPU-Passthrough card here select a vGPU card
Verify the vGPU Scalability
This section can be skipped if vGPU scalability already verified for a Windows guest. Please refer to the steps in Certifying a vGPU for Windows guests > Certifying the vGPU scalability for remaining steps.
Certifying Multiple vGPU for Linux Guests
Note:
This certification step is optional.
Please refer to section Certifying a vGPU for Windows guests to assign multiple vGPUs to a single Linux VM, and then refer to section Certifying vGPUs for Linux guests to do the test.
Submit Test Results
The following items need to be uploaded to XenServer Tracker (https://tracker.citrix.com). Specify HCL Submission as the issue type.
Create a ticket for submission. Please create a Tracker account, if don't have it.
For both Windows and Linux guest.
- Upload a completed version of the certification for supplied with this kit
- Upload a Server Status Report either by exporting it from XenCenter or by running the following at the XenServer console:
xen-bugtool --yestoall
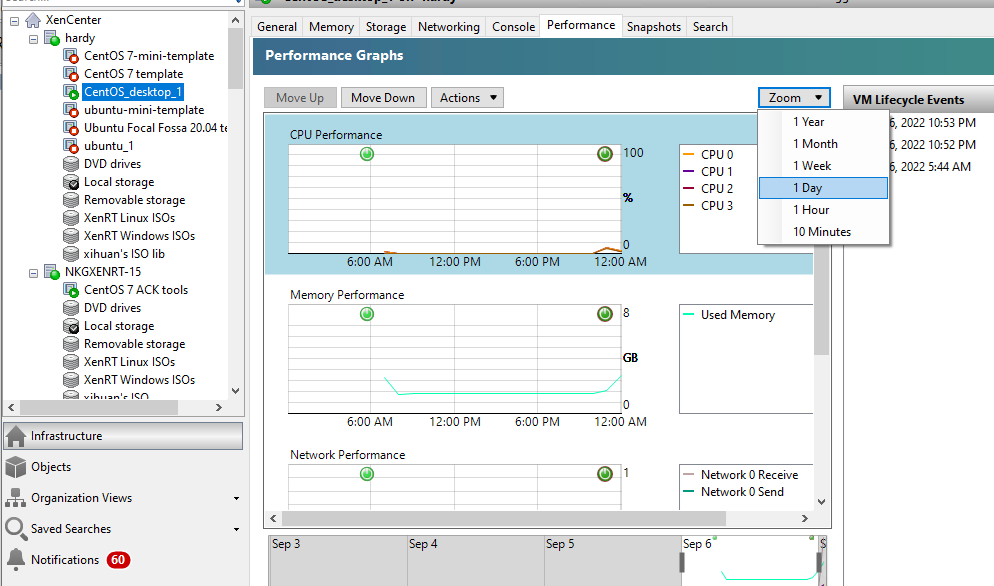
- Upload the XenCenter Performance Tab screen shots taken during stress test
Note: Screen shots taken during stress test for both host and guest VM and ensure performace data contains the half an hour result of section “Run the benchmark test”.
- Upload the benchmark application’s results from all test runs.
- Fill in the information in xenserver-gpu-certification-form.docx and upload it.
- For vGPU certification need to upload screen shots for vGPU migration.
- For multiple vGPU certification need to upload screen shots for VM properties -> GPU tab on XenCenter, to show how many vGPUs has been added to VM.
For Windows guest only.
- Upload the Windows crash screen captures.
- Upload the winsat xml output for each Windows guest.
- For vGPU certification need to upload two screen shots for VM migration, please refer 13.1 & 14.3 in section Verify the vGPU basic functionality.
For Linux guest only.
- Upload the glxinfo and lspci output for each Linux guest, if you are certifying GPU pass-through for Linux and/or vGPU for Linux
- Upload ‘/var/log/kern.log’ file of each Linux guest, if you are certifying GPU passthrough for Linux and/or vGPU for Linux.
- Benchmark results produced from phoronix-test-suite of each Linux guest, if you are certifying GPU pass-through for Linux and/or vGPU for Linux.
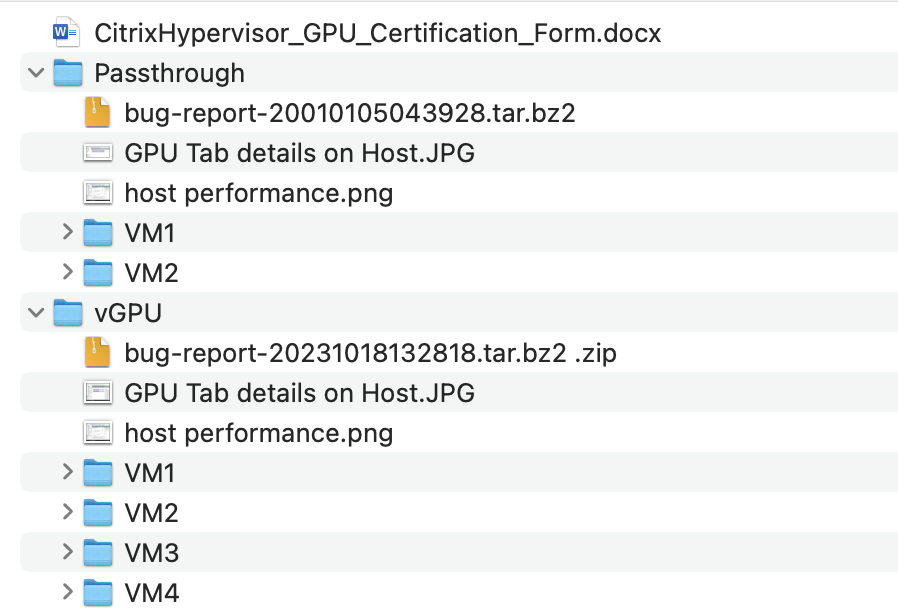
In order to process your test results smoothly and efficiently, we recommend storing your test results in a compressed file in a clear structure. Here is a example:
Notice and Disclaimer
The contents of this kit are subject to change without notice.
Copyright © 2024 Cloud Software Group Inc. All rights reserved. This kits allows to test the products for compatibility with XenServer products. Actual compatibility results may vary. The kit is not designed to test for all compatibility scenarios. Should you use the kit, you must not misrepresent the nature of the results to third parties. TO THE EXTENT PERMITTED BY APPLICABLE LAW, XENSERVER MAKES AND YOU RECEIVE NO WARRANTIES OR CONDITIONS, EXPRESS, IMPLIED, STATUTORY OR OTHERWISE, AND XENSERVER SPECIFICALLY DISCLAIMS WITH RESPECT TO THE KIT ANY CONDITIONS OF QUALITY, AVAILABILITY, RELIABILITY, BUGS OR ERRORS, AND ANY IMPLIED WARRANTIES, INCLUDING, WITHOUT LIMITATION, ANY WARRANTY OF MERCHANTABILITY OR FITNESS FOR A PARTICULAR PURPOSE. YOU ASSUME THE RESPONSIBILITY FOR ANY INVESTMENTS MADE OR COSTS INCURRED TO ACHIEVE YOUR INTENDED RESULTS. TO THE EXTENT PERMITTED BY APPLICABLE LAW, XENSERVER SHALL NOT BE LIABLE FOR ANY DIRECT, INDIRECT, SPECIAL, CONSEQUENTIAL, INCIDENTAL, PUNITIVE OR OTHER DAMAGES (INCLUDING, WITHOUT LIMITATION, DAMAGES FOR LOSS OF INCOME, LOSS OF OPPORTUNITY, LOST PROFITS OR ANY OTHER DAMAGES), HOWEVER CAUSED AND ON ANY THEORY OF LIABILITY, AND WHETHER OR NOT FOR NEGLIGENCE OR OTHERWISE, AND WHETHER OR NOT XENSERVER HAS BEEN ADVISED OF THE POSSIBILITY OF SUCH DAMAGES.